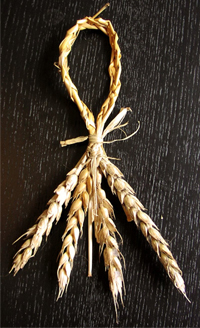
Corn dollies come in all shapes and sizes ranging from simple twisted circlets smaller than a child’s bracelet to huge and complicated edifices which hang like chandeliers from church cross beams.
They were and are usually made around the time of Lammas which is the 1st August. The name is derived from the Anglo-Saxon Loaf Mass and celebrates the festival of the ‘first fruits’.
Lughnasadh, which is Galic for Lugh’s gathering is another name for the festival which is also the feast day of the sun god Lugh and although portraying him at the height of his power, warns that with the fecundity of the harvest, his strength is waning and it will be soon time to sleep until the wheel turns with the spring.
Although commonly seen as decorative items at Christian harvest festivals their origins are decidedly pagan and are part of the celebratory wheel of life which teaches the eternal round of birth, death and renewal.
Traditionally the dollies were made from the last few stalks of corn which would be left standing in the middle of the last harvest field.
This stand was thought to house the corn spirit which took care of the growing corn and ensured a good harvest.
The reaper whose lot it fell to cut down this remaining corn clump was thought to incur bad luck for the rest of the year so to avoid this all the reapers would stand in a circle and throw their scythes at the corn in unison which meant none knew who had felled the home of the corn god.
These stalks were then gathered together and made into dollies of various designs, taken to the farm house where they would be kept throughout the winter before being ploughed into the first furrow of the new season. Thus the wheel of life takes another turn.
Now you know the significance of the dollies and the spirit of the corn here’s how you can make a very simple dolly.
- First find some nice strong corn stalks. You can use any type of corn, e.g. oats, barely, wheat. I prefer barley as they have nice wispy beards which if you mange to find some which are not quite ready for harvesting will be a lovely mix of green and gold.
By the way, make sure you have permission before marching into a farmer’s field and helping yourself and then only pick from against the hedge where the combine harvester can’t reach.
2. You can use the stalks straight away, but they will be easier to work with if you soak them in water for a couple of hours.
Take three long stalks and with the heads of corn facing downwards start plaiting as you would if plaiting a child’s hair.
3. When you get to the end leave half and inch or so of stalk un-plaited and secure it with a clothes peg.
4. Decorate by tying off with ribbon or raffia or some other decorative material.
Green is traditionally used to decorate the dolly, but red has become very popular. Whatever colour or material you use make sure you tie it well before removing the clothes peg!
This is a very simple dolly which you can make look very attractive by letting your imagination run wild when decorating.
If you would rather try your hand at something more complicated here are some good tutorials to help you along the way.
Here’s one that’s not too difficult from the Eden Project:
https://www.edenproject.com/learn/for-everyone/how-to-make-a-corn-dolly
Stick In The Wheel came up with this:
(With thanks to A Bad Witch for the simple corn dollie above).
